MHD Riemann Problems
I’ll be using a selection of MHD Riemann Problems and shock tubes to test my HLLD and overall MHD implementation so I wanted to gather some of the basics here. This post was originally written with information from Miniati & Martin 20111. Citations are at the bottom and images are cited in their captions.
Once MHD is fully implemented a followup post will follow with non-Riemann test problems such as the Orszag-Tang Vortex.
Table of Riemann Problems
Please note that many of the cited papers have typos in their initial conditions. These are the correct initial conditions as verified by the Athena code and the plots in the papers
| Field | Brio & Wu2 | Dai & Woodward3 | Einfeldt Strong Rarefaction45 | Ryu & Jones 1a6 | Ryu & Jones 4d6 |
| \( \gamma \) | \( 2 \) | \( \frac{5}{3} \) | \( 1.4 \) | \( \frac{5}{3} \) | \( \frac{5}{3} \) |
| \( t_{max} \) | \( 0.1 \) | \( 0.2 \) | \( 0.16 \) | \( 0.08 \) | \( 0.16 \) |
| Left | |||||
| \( \rho \) | \( 1.0 \) | \( 1.08 \) | \( 1.0 \) | \( 1.0 \) | \( 1.0 \) |
| \( P \) | \( 1.0 \) | \( 0.95 \) | \( 0.45 \) | \( 20 \) | \( 1.0 \) |
| \( V_x \) | \( 0.0 \) | \( 1.2 \) | \( -v_0 = -2.0 \) | \( 10.0 \) | \( 0.0 \) |
| \( V_y \) | \( 0.0 \) | \( 0.01 \) | \( 0.0 \) | \( 0.0 \) | \( 0.0 \) |
| \( V_z \) | \( 0.0 \) | \( 0.5 \) | \( 0.0 \) | \( 0.0 \) | \( 0.0 \) |
| \( B_x \) | \( 0.75 \) | \( \frac{2}{\sqrt{4\pi}} \) | \( 0.0 \) | \( \frac{5}{\sqrt{4\pi}} \) | \( 0.7 \) |
| \( B_y \) | \( 1.0 \) | \( \frac{3.6}{\sqrt{4\pi}} \) | \( 0.5 \) | \( \frac{5}{\sqrt{4\pi}} \) | \( 0.0 \) |
| \( B_z \) | \( 0.0 \) | \( \frac{2}{\sqrt{4\pi}} \) | \( 0.0 \) | \( 0.0 \) | \( 0.0 \) |
| Right | |||||
| \( \rho \) | \( 0.125 \) | \( 1.0 \) | \( 1.0 \) | \( 1.0 \) | \( 0.3 \) |
| \( P \) | \( 0.1 \) | \( 1.0 \) | \( 0.45 \) | \( 1.0 \) | \( 0.2 \) |
| \( V_x \) | \( 0.0 \) | \( 0.0 \) | \( v_0 = 2.0 \) | \( -10 \) | \( 0.0 \) |
| \( V_y \) | \( 0.0 \) | \( 0.0 \) | \( 0.0 \) | \( 0.0 \) | \( 0.0 \) |
| \( V_z \) | \( 0.0 \) | \( 0.0 \) | \( 0.0 \) | \( 0.0 \) | \( 1.0 \) |
| \( B_x \) | \( 0.75 \) | \( \frac{2}{\sqrt{4\pi}} \) | \( 0.0 \) | \( \frac{5}{\sqrt{4\pi}} \) | \( 0.7 \) |
| \( B_y \) | \( -1.0 \) | \( \frac{4}{\sqrt{4\pi}} \) | \( 0.5 \) | \( \frac{5}{\sqrt{4\pi}} \) | \( 1.0 \) |
| \( B_z \) | \( 0.0 \) | \( \frac{2}{\sqrt{4\pi}} \) | \( 0.0 \) | \( 0.0 \) | \( 0.0 \) |
Details on Each Problem
Brio & Wu Shock Tube2
The Brio & Wu Shock Tube is essentially a Sod Sock Tube with magnetic fields. It shows most of the MHD waves and is a good stress test for approximate Riemann solvers and MHD simulation code.
Waves, left to right:
- Fast rarefaction
- Compound wave
- Contact discontinuity
- Slow shock
- Fast rarefaction
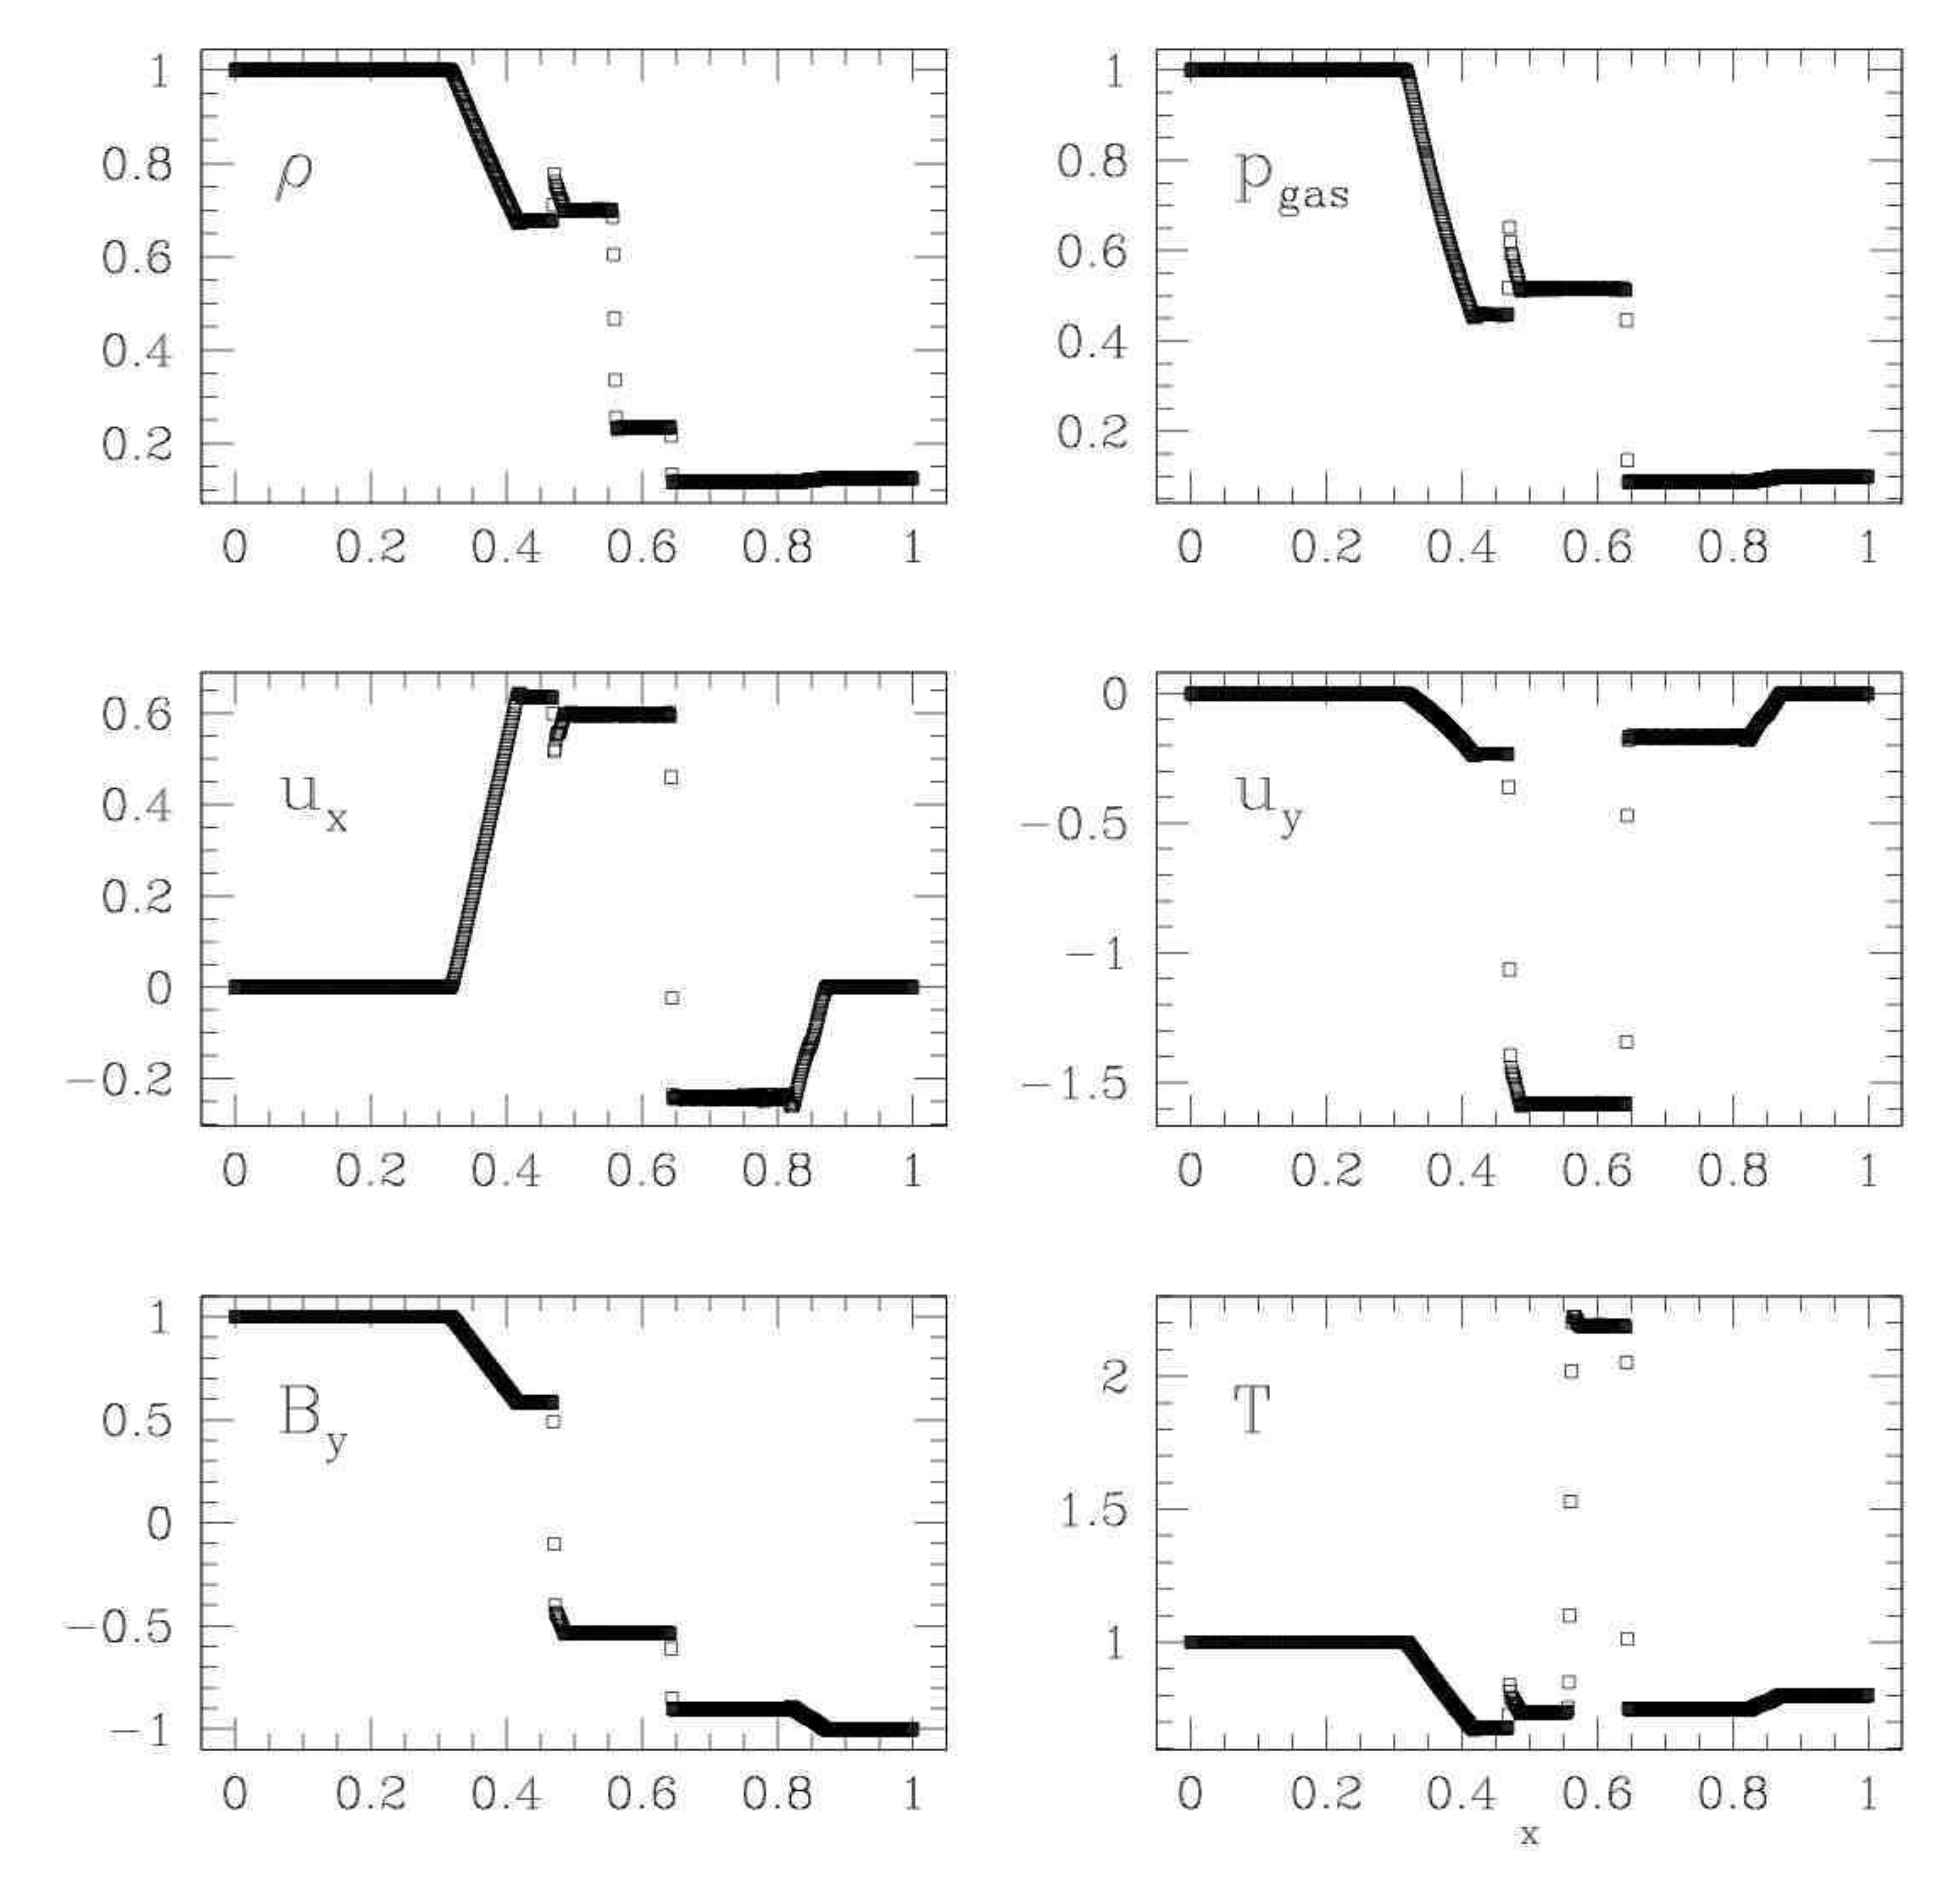 Brio & Wu Shock Tube at \( t=0.1 \). Source: Figure 2 from Miniati & Martin 20111
Dai & Woodward Shock Tube3
The Dai & Woodward Shock Tube produces 3 pairs of MHD waves moving outwards from the central contact discontinuity. This is probably a more robust test of MHD than the Brio & Wu Shock Tube since it shows all 7 MHD waves.
Waves, left ot right:
- Fast shock
- Alfvên/Rotation waves
- Slow shock
- Contact discontinuity
- Slow shock
- Alfvên/Rotation waves
- Fast shock
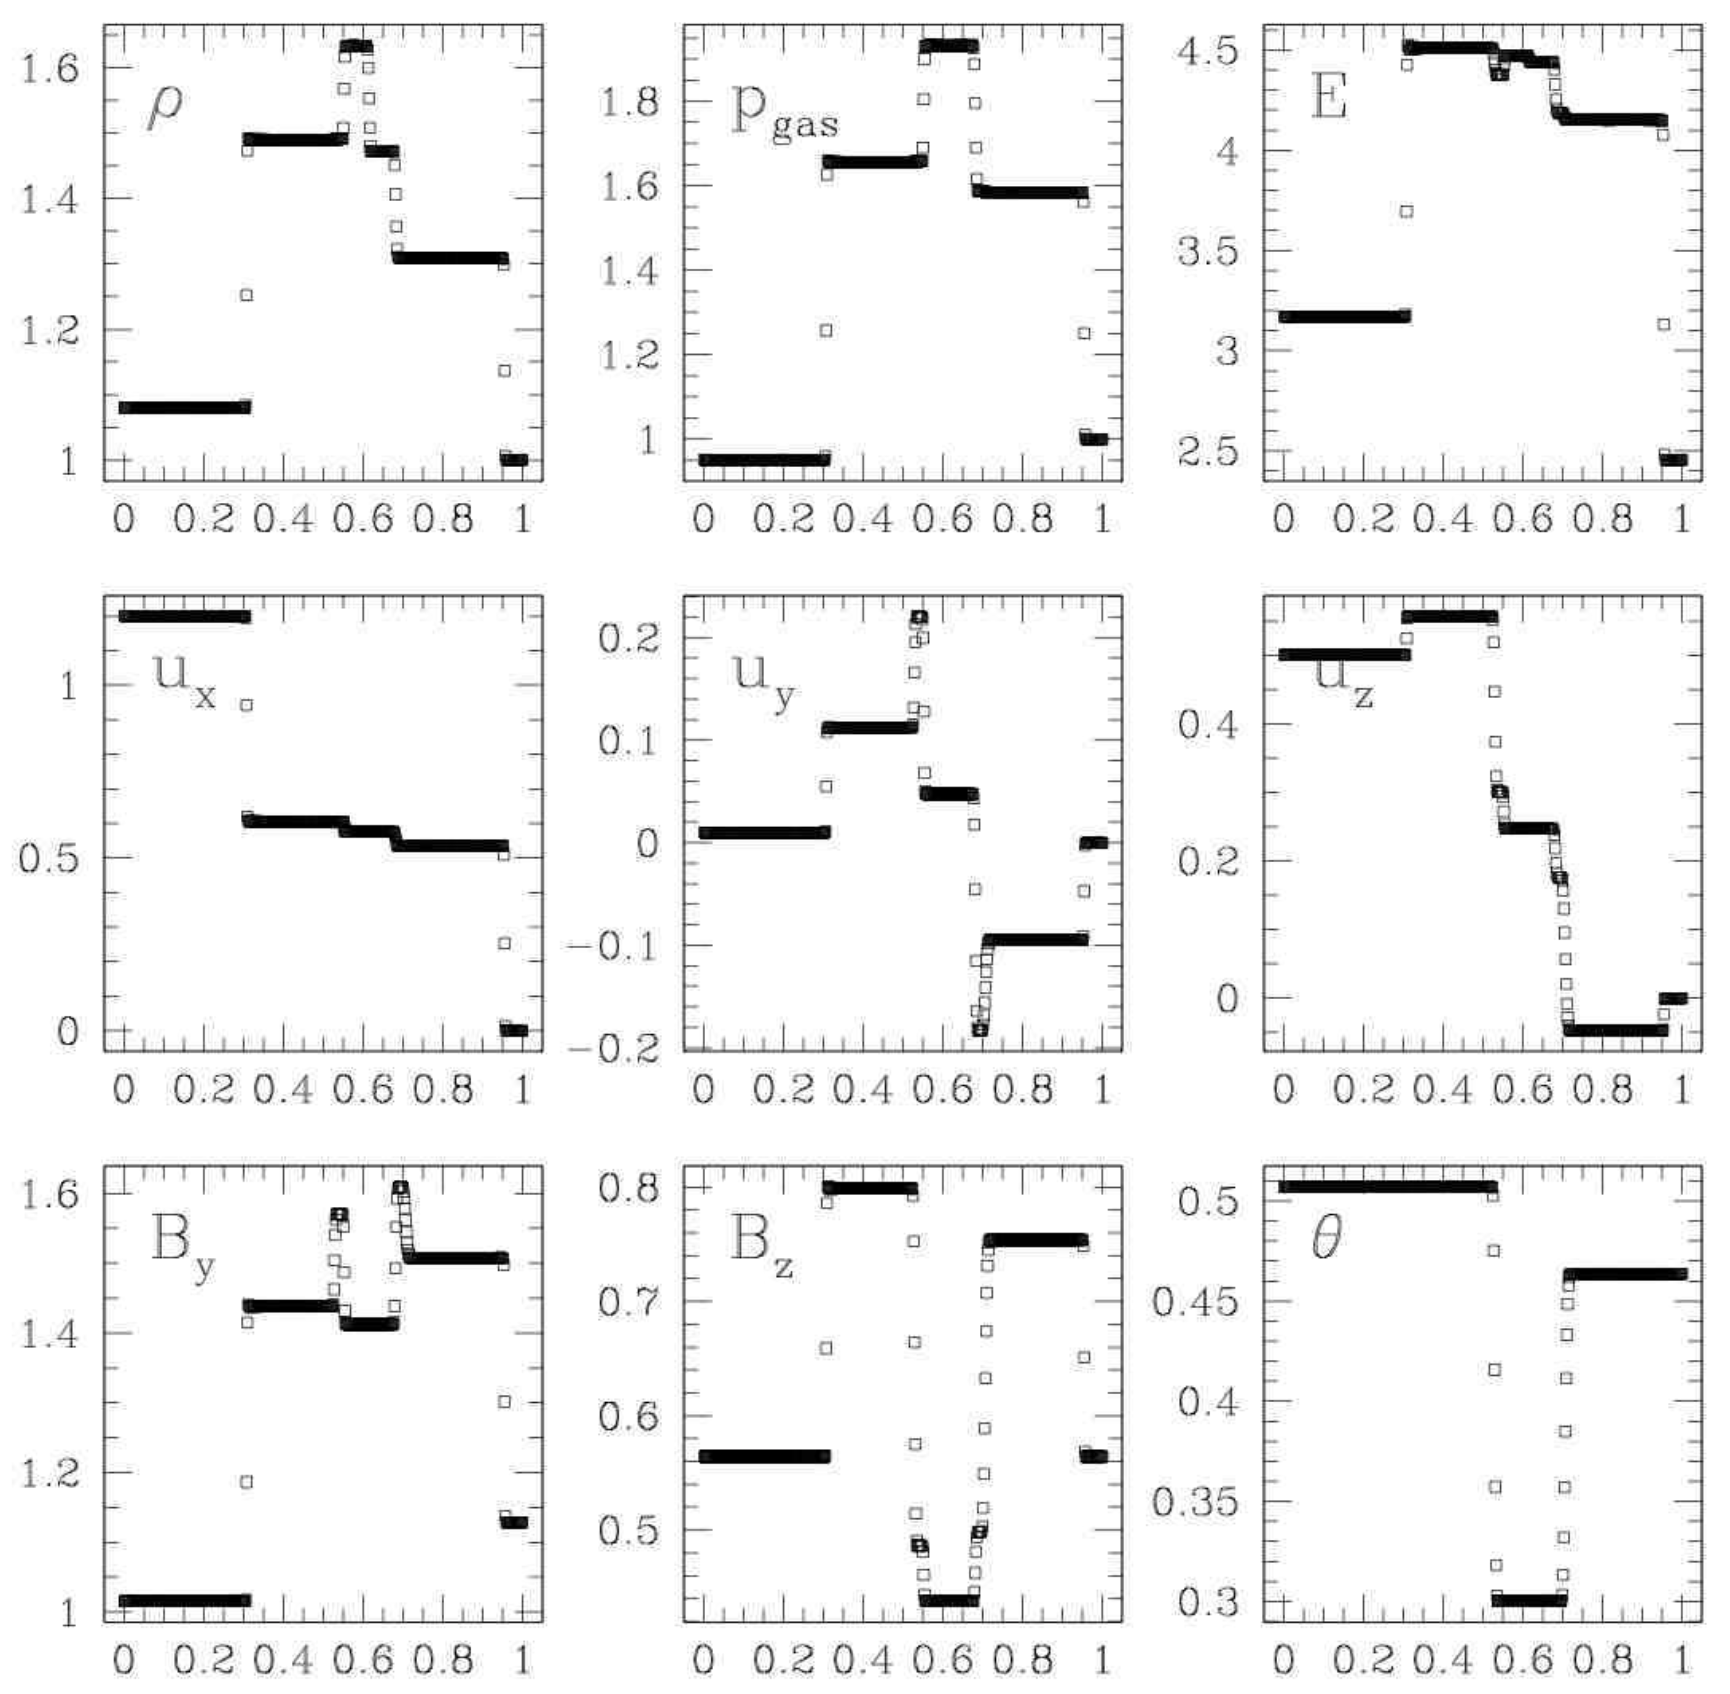 Dai & Woodward Shock Tube at \( t=0.2 \). Source: Figure 3 from Miniati & Martin 20111
Einfeldt Strong Rarefaction45
This is the only test here that isn’t a shock tube. We have identical initial conditions on both sides, except the \( x \)-velocity which is negative on the left side and positive on the right. This velocity, \( V_0 \), can lead to spurious oscillation with high order Godunov schemes1 when \( V_0 \) is large (\( V_0 \ge 3 \)) and so I’ve chosen a more conservative value of \( V_0=2 \) . These diverging fluids lead to an extremely strong and fast rarefaction where the energy is dominated by kinetic energy and can often reveal issues in code accuracy since it can lead to nonphysical states with negative density or internal energy
Waves, left ot right:
- Fast rarefaction
- Fast rarefaction
 EinFeldt Strong Rarefaction at \( t=0.16 \). Source: Figure 5 from Miniati & Martin 20111
Ryu & Jones Shock Tube 1a6
Ryu & Jones 1995 contains a wealth of different shock tubes and is an excellent resource. Shock tube 1a has a fairly simple and easy to read set of 5 waves. Does not include an Alfvên wave
Waves, left ot right:
- Fast shock
- Slow rarefaction
- Contact discontinuity
- Slow shock
- Fast shock
 Ryu & Jones Shock Tube at \( t=0.08 \). Source: Figure 1a from Ryu & Jones 1995 6
Ryu & Jones Shock Tube 4d6
Shock Tube 4d features a switch-on slow rarefaction. Switch-on/off magnetosonic waves cause the tangential magnetic field to turn on/off.
Waves, left ot right:
- Hydrodynamic rarefaction
- Switch on slow shock
- Contact discontinuity
- Slow Shock
- Alfvên/Rotation wave
- Fast rarefaction
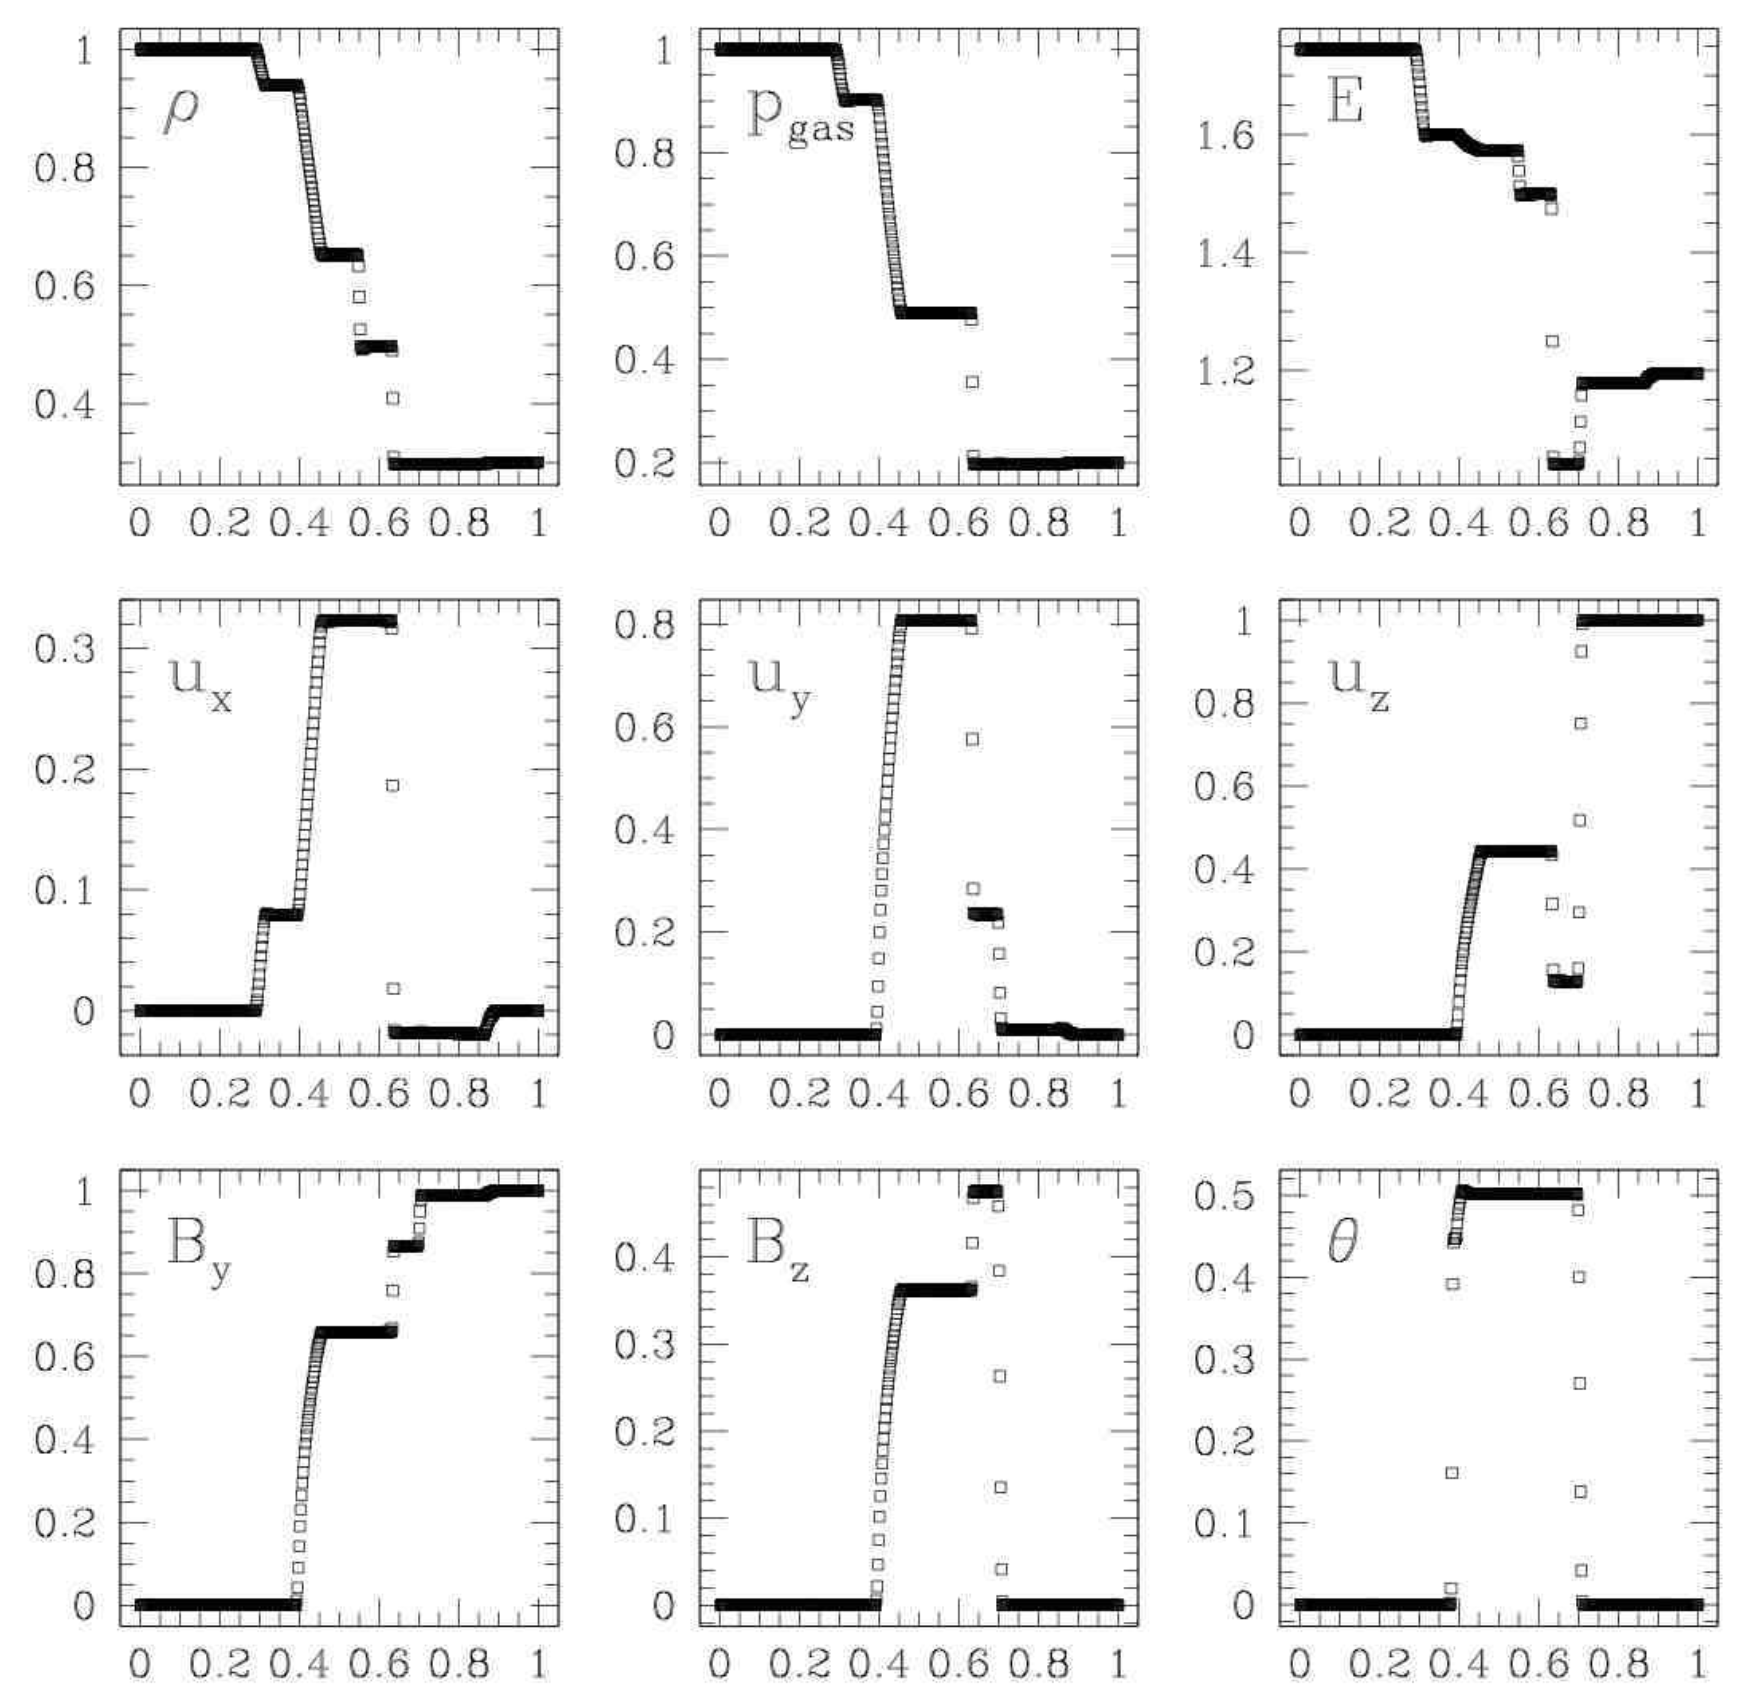 Ryu & Jones Shock Tube at \( t=0.16 \). Source: Figure 4 from Miniati & Martin 20111
Citations
Miniati, F., & Martin, D. F. (2011). Constrained-transport magnetohydrodynamics with adaptive mesh refinement in CHARM. Astrophysical Journal, Supplement Series, 195(1). https://doi.org/10.1088/0067-0049/195/1/5 ↩︎ ↩︎2 ↩︎3 ↩︎4 ↩︎5 ↩︎6
Brio, M., & Wu, C. C. (1988). An Upwind Differencing Scheme for the Equations of Ideal Magnetohydrodynamics. JOURNAL OF COMPUTATIONAL PHYSICS, 75, 40–422. https://ui.adsabs.harvard.edu/abs/1988JCoPh..75..400B/abstract ↩︎ ↩︎2
Dai, W., & Woodward, P. R. (1998). ON THE DIVERGENCE-FREE CONDITION AND CONSERVATION LAWS IN NUMERICAL SIMULATIONS FOR SUPERSONIC MAGNETOHYDRODYNAMIC FLOWS. THE ASTROPHYSICAL JOURNAL, 494, 317–335. https://iopscience.iop.org/article/10.1086/305176/meta ↩︎ ↩︎2
Einfeldt, B., Munz, C. D., Roe, P. L., & W green, B. (1991). On Godunov-Type Methods near Low Densities. JOURNAL OF COMPUTATIONAL PHYSICS, 92, 213–295. https://ui.adsabs.harvard.edu/abs/1991JCoPh..92..273E/abstract ↩︎ ↩︎2
Miyoshi, T., & Kusano, K. (2005). A multi-state HLL approximate Riemann solver for ideal magnetohydrodynamics. Journal of Computational Physics, 208(1), 315–344. https://doi.org/10.1016/j.jcp.2005.02.017 ↩︎ ↩︎2
Ryu, D., Jones, T. W., & Frank, A. (1995). Numerical Magnetohydrodynamics in Astrophysics: Algorithm and Tests for Multi-Dimensional Flow 1. The Astrophysical Journal. https://ui.adsabs.harvard.edu/abs/1995ApJ…442..228R/abstract ↩︎ ↩︎2 ↩︎3 ↩︎4 ↩︎5